
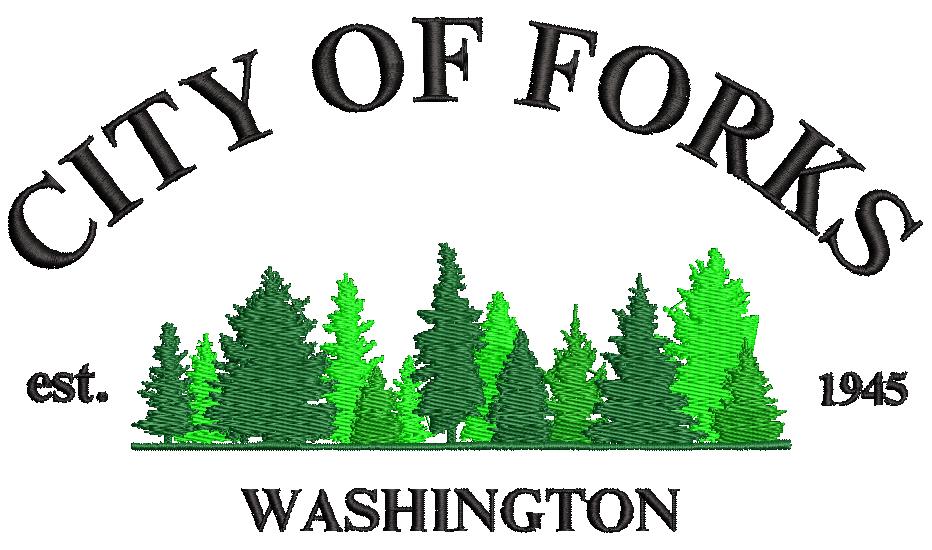
If you’ve ever tried to load a photo or logo straight into an embroidery machine, you’ve probably hit the same wall every beginner does: nothing happens. Embroidery machines don’t “read” images the way a printer does. Before any design can be stitched onto fabric, it has to go through a process called embroidery digitizing, and if you’re asking what embroidery digitizing is, you’re in exactly the right place.
This guide breaks down what is embroidery digitizing in plain English: why it matters, how the process works step by step, what it costs, and how to decide whether to learn it yourself or hand it off to a professional.
What Is Embroidery Digitizing, Exactly?
Embroidery digitizing is the process of converting an image – a logo, a piece of artwork, or a hand-drawn design- into a special file made up of stitch instructions that an embroidery machine can follow. That’s the short answer to what is embroidery digitizing; the rest of this guide covers the how and why.
Instead of pixels or colors, a digitized file tells the machine things like:
- Path: where each stitch starts and ends
- Direction: which way the stitches run across each section
- Stitch type: satin, fill, running stitch, or a combination
- Color changes: exactly where the machine should stop and switch thread
- Trims and jumps: where the machine cuts thread or moves to the next section without stitching
In short, digitizing turns a picture into a set of movement instructions for a needle. It’s less like “converting a file format” and more like translating an image into a language only an embroidery machine understands.

Why Can’t You Just Upload a JPG or PNG?
This is the question almost every beginner asks first. A JPG or PNG file is made of pixels, tiny colored squares arranged in a grid. An embroidery machine doesn’t think in pixels; it thinks in thread paths, stitch density, and fabric behavior.
A digitizer (a trained person, often working with specialized software) has to make judgment calls that software alone can’t fully automate, such as:
- How dense the stitches should be for a given fabric: a stretchy T-shirt needs different settings than a stiff canvas cap
- Which parts of the design should be filled solid versus outlined only
- How to sequence colors so the machine doesn’t jump back and forth unnecessarily, wasting thread and time
- How to handle small text or fine details so they don’t turn into an unreadable blob of thread
- Where to add stabilizing understitches so the final design doesn’t warp the fabric
Skip this step, or have it done poorly, and you end up with puckered fabric, thread breaks mid-stitch, text that reads as a smudge, or a design that barely resembles the original artwork. This is the single biggest reason “just upload the picture” doesn’t work in embroidery the way it does in printing.
The Digitizing Process, Step by Step
While every digitizer has their own workflow and software preferences, the process generally follows these stages:
- Receiving the artwork: usually a JPG, PNG, PDF, or vector file (AI, EPS, SVG) of the logo or design. Vector files are ideal because the shapes are already clean and scalable.
- Sizing the design: deciding the final embroidered dimensions, since stitch settings change depending on how large or small the design will be.
- Tracing the design digitally: the digitizer maps out each shape in digitizing software, deciding which areas become satin stitches, fill stitches, or simple outlines.
- Setting stitch direction and density: this affects both how the finished design looks (shine, texture) and how well it holds up over time and through washing.
- Adding underlay stitches: a foundation layer stitched first that stabilizes the fabric and keeps the top stitches from sinking in or puckering.
- Sequencing colors: organizing the stitch order so the machine changes thread as few times as possible, which saves production time.
- Testing with a sample stitch-out: a careful digitizer runs the design on scrap or similar fabric to catch density, tension, or alignment issues before delivering the final file.
- Making adjustments: based on the test stitch-out, tweaking density, underlay, or stitch type where needed.
- Exporting the final file: saving the finished design in the format your specific embroidery machine uses.
A design that skips the testing step (number 7) is where most quality problems come from: it’s the difference between a file that looks correct on a screen and one that actually stitches out cleanly on real fabric.
Common Embroidery File Formats
Once a design is digitized, it’s saved as a machine-readable stitch file. Unlike image formats, these aren’t interchangeable by default; your machine only reads specific formats. The most common ones are:
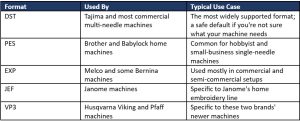
If you’re not sure which format you need, check your embroidery machine’s manual or on-screen settings menu. Most machines only accept one or two specific formats, and loading the wrong one simply won’t work.
Digitizing a Logo vs. Digitizing General Artwork
“Digitizing a logo” and “digitizing embroidery designs” refer to the same underlying process, but logos come with their own quirks that are worth knowing about:
- Small text: logos often include company names or taglines in small fonts, which can blur into unreadable thread if not adjusted for embroidery scale
- Thin lines: fine linework that looks crisp on screen may not translate well into stitches and can disappear or fray
- Gradients and shading: embroidery thread comes in solid colors, so gradients have to be simplified or approximated with color blending techniques
- Tight spacing: elements placed close together in a logo may need slight separation so the stitches don’t merge into a blob
A skilled digitizer will often suggest small adjustments, like slightly thickening a thin line or simplifying a gradient, to make sure the embroidered version looks clean and professional rather than a rough approximation of the original file. This is normal; embroidery is a physical medium with its own constraints, similar to how a photo needs different treatment for print versus screen.
How Much Does Embroidery Digitizing Cost?
Once you understand what is embroidery digitizing and why it’s necessary, the next logical question is usually price. Pricing varies depending on a few factors:
- Design complexity: simple logos with basic shapes and minimal text are quicker and cheaper to digitize than detailed designs with fine lettering, shading, or photorealistic elements
- Stitch count: larger, denser designs take more stitches to produce, which affects both digitizing time and later production time
- Number of colors: more thread color changes generally mean more setup work
- Turnaround time: standard turnaround is usually cheaper than rush or same-day service
- Revisions: some services include unlimited revisions in the price, while others charge for changes after the first draft
Simple logo digitizing can start as low as a few dollars per design, while complex, highly detailed work costs more. If you’re comparing services, ask what’s included: file formats, revisions, and turnaround time can vary even when the sticker price looks similar.
Should You Digitize It Yourself or Hire a Service?
DIY digitizing makes sense if you:
- Already own digitizing software (such as Hatch, Embrilliance, or Wilcom)
- Have time to learn the software and troubleshoot stitch-outs through trial and error
- Only need occasional, simple designs: basic shapes or text
- Enjoy the technical, hands-on side of embroidery as a hobby in itself
Hiring a digitizing service makes sense if you:
- Need a fast turnaround and don’t have time to learn a new software
- Want a professional-quality result without the trial-and-error learning curve
- Are digitizing logos or designs for clients, teams, or a growing business
- Don’t own or don’t want to pay for : dedicated digitizing software
- Are working with a detailed logo that includes small text, gradients, or fine linework
For most small businesses, embroiderers, and hobbyists working with logos or detailed designs, outsourcing to a digitizing service is usually faster and more cost-effective than digitizing from scratch : especially once you factor in the cost of software and the time spent learning it.
Tips for a Smoother Digitizing Experience
- Send the highest-quality file you have. A vector file (AI, EPS, SVG) or a high-resolution image gives the digitizer more to work with than a blurry screenshot.
- Specify the finished size. Stitch density and detail level change depending on whether a design will be 2 inches or 8 inches wide.
- Mention the fabric. A design going on a stiff cap needs different settings than one going on a stretchy hoodie.
- Confirm your file format upfront. Check your machine’s manual so you request the right format the first time.
- Ask about revisions. Knowing whether adjustments are included in the price avoids surprises later.
Frequently Asked Questions
What is embroidery digitizing in one sentence?
It’s the process of turning an image into a stitch-by-stitch instruction file that an embroidery machine can read and sew, covering stitch type, direction, density, and color changes.
Is digitizing the same as vectorizing?
No. Vectorizing converts an image into scalable vector shapes (for things like decals or printing). Digitizing converts an image into stitch instructions for embroidery. They’re related but serve different purposes: you may vectorize an image first to clean it up before digitizing it.
Can any image be digitized?
Most images can be digitized, but not all will embroider equally well. Simple logos with clear shapes and limited colors translate best. Highly detailed photographs or designs with fine gradients require more simplification and may lose some detail in the process.
How long does digitizing take?
Turnaround depends on the service and design complexity. Simple designs can be digitized in a matter of hours with rush service, while more detailed work or standard (non-rush) queues may take a day or more.
Do I need different digitized files for different machines?
You need the file exported in the format your machine reads (DST, PES, EXP, JEF, or VP3, for example). Many digitizing services will provide the same design in multiple formats so you’re covered if you ever switch machines.
Final Thoughts
So, what is embroidery digitizing, in the end? It’s the bridge between “I have a logo” and “I have a beautifully stitched design on a hat, shirt, or jacket.” Understanding the basics, what digitizing does, why it’s necessary, how the process works, and which file format you need, makes it much easier to communicate with a digitizer and get a design that stitches out exactly the way you imagined.
If you have a logo or artwork you’d like turned into a stitch-ready embroidery file, you can send it over for digitizing and get it back in your machine’s format, ready to sew.